MyVote - Viewing and Managing Results
To view the results of voting, click on Results at the top of the Home Screen. On the results page, you will see the PNM filter options and the Results ranked in order by Overall score according to your national organization's standards.
The colored dots next to the PNM name denote the tag(s) that PNM has received. Hover over the colored dot to see the tag description and tag count.
Any PNM highlighted in Blue with a star is a legacy of your chapter determined using the Legacy tag.
Any PNM highlighted in Red is a grade risk determined using the grade risk indicator.
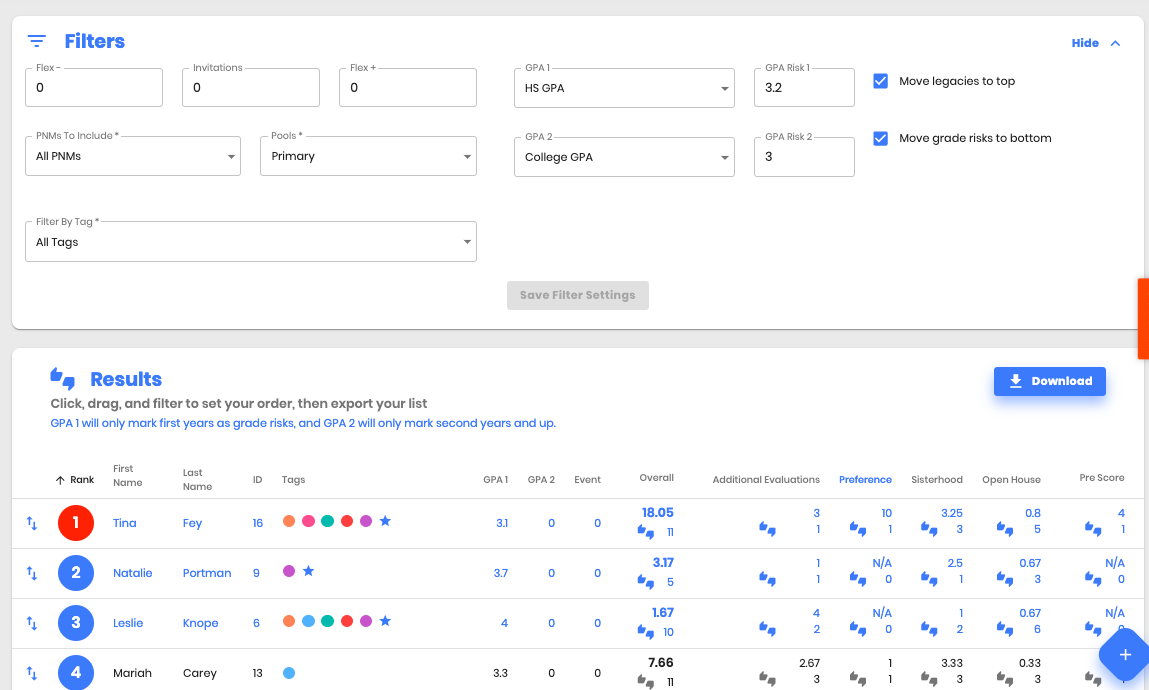
Filters
The filter settings will adjust the way your results appear.
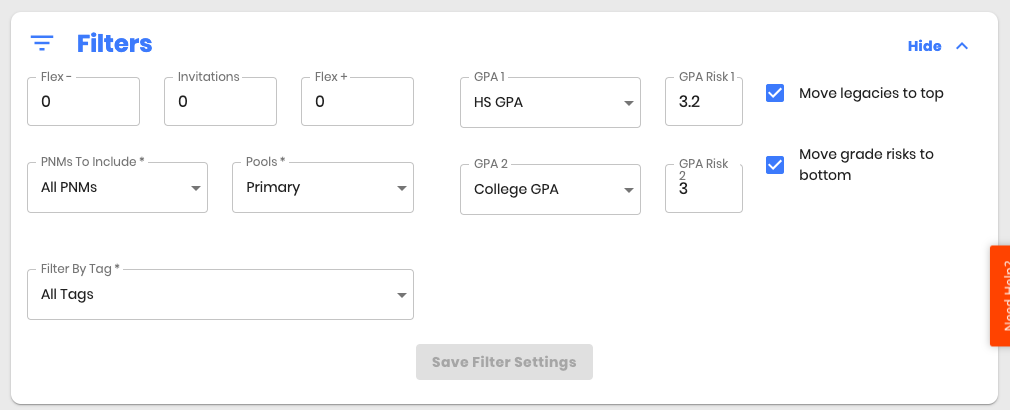
Enter Invitation & Flex +/- Numbers
At the top of the results screen, you will see a place to enter the invitation number (carry figure) your chapter can invite back for the next round of recruitment. You can also enter the flex plus and minus numbers you are given. Once you click Update, the View Results page will update with blue bars defining where your invitation list ends and where your flex plus/minus lists are.
When using this filter, your export will create your list in the order needed to submit it to CapmpusDirector. If your council uses another recruitment management tool, you may need to make the necessary changes. This includes dividing invitation and flex lists, as well as inverting the flex minus list to submit in the correct order of PNMs to be flexed off of the invitation list.
Grade Risk Indicator
You can enter two different GPA requirements for your organization. GPA 1 should be used for high school GPA and GPA 2 should be used for college GPA. Enter your GPA minimums and click Save Filter Settings. Any PNM that does not meet these requirements will appear in a red font.
You can also select the check box next to the Grade Risk indicators to move all PNMs who are a grade risk to the bottom of the list.
Move to Top/Bottom for Grade Risks, Legacies, or Custom Tag
Move legacies to top - If a PNM is tagged as a Legacy, they will appear in the results list in a blue font. By checking this option, legacies will be moved to the top of your results list regardless of their overall score.
Move grade risks to bottom - The check box to move grade risks to bottom, will move all PNMs who are identified as a grade risk to the bottom of the list, regardless of their overall score.
Move by Tag - Select a tag from the drop-down options, and toggle Move to top or bottom. Toggle Up for the top and down for the bottom. PNMs with the selected tag will then be moved, regardless of their overall score. The desired tag must be created in Settings before using this feature.
PNMs to Include
Filter your results to see:
All PNMs - This includes all active PNMs and is the filter you should use when creating your invitation, flex, and bid lists.
Legacies - When using this filter, you will only see Active Legacy PNMs. Legacies are noted by being tagged with the Legacy tag.
Withdrawn PNMs - Viewing the results of your Withdrawn PNMs can help your chapter create a snap bid and COB lists.
Note, PNMs with the status of RG - Regret, RL - Released, NA - Not Applicable, or NS - No Show, are not eligible to see on the Results page.
Pools
If your council uses a secondary pool, you can filter your results to show All Pools, Primary pool PNMs, or Secondary PNMs.
Filter By Tags
Filter your results list to show only PNMs with the specific tag(s) selected from the drop-down list of options. More than one tag can be selected at a time. To remove the tag filter, simply deselect the tag from the drop-down list of options. Tags must be assigned to PNMs before this filter is used.
Filter by Event
Filter your results to see only PNMs attending a specific event(s). More than one event can be selected at a time. To remove the event filter, simply deselect the tag from the drop-down list of options. Events reference the events of the current round as set on your Home page. PNMs must be assigned to an event before this filter can be used.
Search PNMs
If you are looking for a specific PNM in the results list, you can type their name or PNM ID# in the text box and select them.
Advanced Display Options
Using the Advanced Display Options allows you to customize what information is available in your results list. This can help to add information that will help you make membership selection decisions, or remove data you don’t need to see in your results.
Display Overall Scores
Display Round Scores
Display Category Score - Note, that some accounts don’t use categories when voting.
Include GPA 1 and 2 - 1 represents high school GPA, and 2 represents college GPA.
Include PNM Images
Include PNM Tags - This also allows you to add tags to a PNM while on the Results page.
Include PNM Status
Search Fields to Display - Fields must be set up in Settings prior to using this feature.
Results
The results list will show the PNMs ranking according to the overall score and the filters you applied.
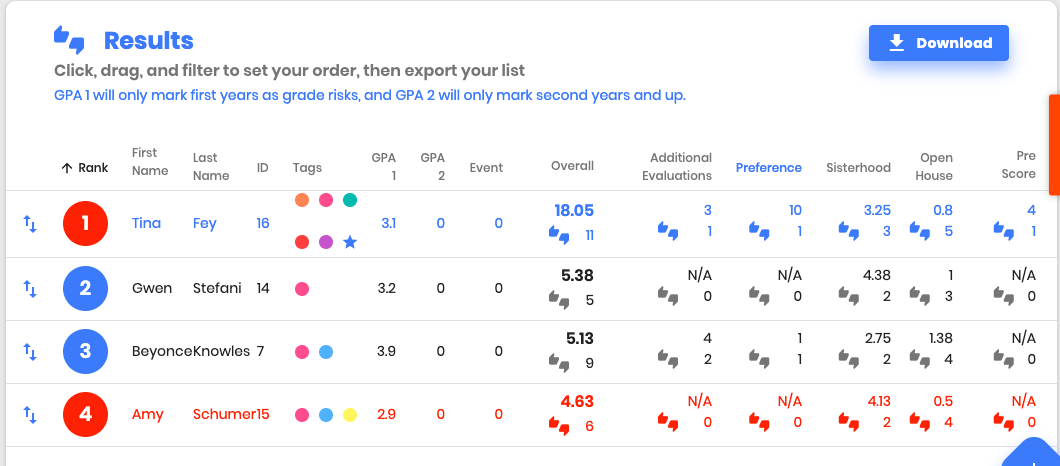
You can adjust the list by dragging and dropping PNMs into a different order, selecting the name of a specific round to sort by round, or selecting another column name to sort by that column’s value.
Download
Once you are satisfied with the results list, you can download them to an excel spreadsheet. Your export will include all the information you have chosen to include in the results page.
If using the invitation and flex list indicators, this export will match the format needed to import your list in CampusDirector. This includes separating the invitation and flex lists and inverting the flex minus list to represent the order PNMs should be flexed off your invitation list. Any PNMs who do not make it on your invitation or flex lists will be separated by a blank row and should be deleted prior to uploading to CampusDirector.
You can also export to manipulate the list however you deem necessary for ordering and importing to your council’s alternate recruitment management technology.
Related Articles
MyVote - Rounds missing from Results
Are you not seeing all your rounds in your results tab? Don't worry, it is most like you haven't selected them in your display options. How to ensure all rounds are displaying in your results Navigate to your Results tab Click "Advanced Display ...MyVote - Managing Your Chapter's Settings and Features
You can set up your chapter-specific settings by going to Settings > Chapter. Under the 'Chapter Info' section, you can update the address or location of your chapter. Some fields in this section can only be edited by the Phired Up support staff. You ...MyVote - How to Use Training Mode
The MyVote Training Mode is a feature of MyVote for practicing voting and onboarding members to your MyVote account. While in Training Mode, Voting Members can practice voting for each round. Admins can practice using admin features such as tags, ...MyVote - Get Familiar With MyVote
Welcome to your MyVote account! Get started with familiarizing yourself with the home screen of MyVote here. Each time you log in to MyVote you will arrive at the Home Screen. The Home Screen shows the following data: If Voting is Open or Closed, if ...MyVote - MyVote Recruitment Set-Up Checklist
Follow these steps to ensure you are ready for recruitment! We recommend ensuring your site is ready at least 2 weeks before recruitment starts. Learn MyVote- As a chapter admin, you must be versed in how to use MyVote. There are many options of how ...